بایگانی برچسب: s

داینامیکس ۳۶۵ مالی و عملیاتی- کلیدهای میانبر (قسمت دوم)

میانبرها یا Shortcut key ازجمله امکاناتی می‌باشند که استفاده از یک نرم افزار را ساده‌تر و سریعتر می‌کند. البته با توجه به تنوع عملیات و گستره کاری امکان به یاد داشتن همه آنها میسر نمی‌باشد و لازم است کاربر به لیست آنها با توجه به عملیات جاری دسترسی داشته باشد.

قبل از PU12:

تا قبل از بروزرسانی پلت فرم ۱۲ (PU 12) در نوامبر ۲۰۱۷ ، کلیدهای میانبر مختص عملیات و منو آیتمها را، با نگه داشتن موس بر روی آنها و یا جستجو کردن در اینترنت، می‌توان یافت. از جمله لینکهای قابل استفاده برای این منظور ، آدرس ذیل است که لیست کاملی از میانبرها را شامل می‌گردد. طی نوشتاری در همین سایت نیز به آن پرداخته شده است.

https://docs.microsoft.com/en-us/dynamics365/unified-operations/fin-and-ops/get-started/shortcut-keys

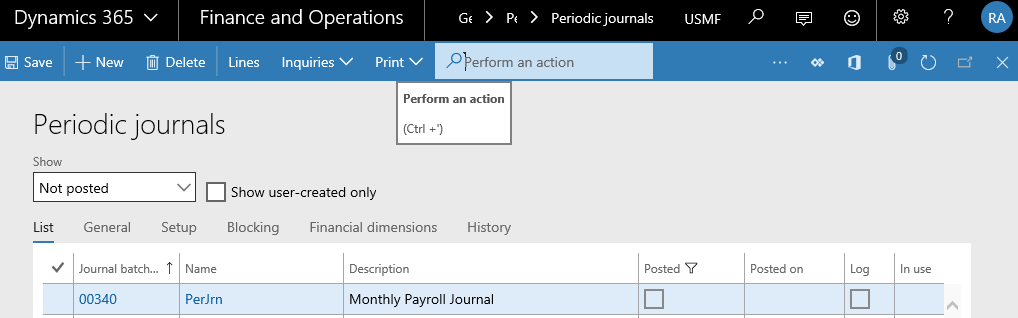
البته مواردی نیازمند بررسی نیز وجود داشت. بطور مثال داینامیکس ۳۶۵ به کاربران اعلام داشت که (/+Ctrl)  میانبری برای جستجو و (‘+Ctrl) میانبری برای جستجو در عملیاتهای اجرایی یا Performan Action فرمها مانند فرم مشتری و یا سایر فرمهای مشابه که دارای عملیات است، می‌باشد.

Search
Performan Action

مادامی که میانبر (‘+Ctrl) را به منظور جستجوی عملیاتهای اجرایی انتخاب می‌شود ولی موردی برای نمایش موجود نباشد، کاربر به فیلد جستجو ارجاع داده می‌شود. یکی دیگر از موارد اثر گذار در میانبرها، قالب صفحه کلید مورد استفاده است. داینامیکس ۳۶۵ از قالب United States Keyboard استفاده می‌کند.

با توجه به محدودیت قالب مورد استفاده در صفحه کلید، داینامیکس نسبت به جایگزینی تعدادی از کلیدهای میانبر اقدام کرده است. بطور نمونه میانبر(Alt+Q) که در مستندات مایکروسافت نیز اعلام شده است و محل استفاده آن جستجوی عملیات می‌باشد و با میانبر اعلام شده قبلی همپوشانی دارد. البته این همپوشانی‌ها می‌تواند باعث سردرگمی کاربر و در نتیجه کاهش استفاده از آن گردد.

 بروزسانی PU12:

با انتشار پلت فرم ۱۲ در نوامبر ۲۰۱۷ تغییراتی در کلیدهای میانبر داده شده است. در مهمترین تغییر یافتن کلیدهای میانبر در یک فرم آسانتر شده است.

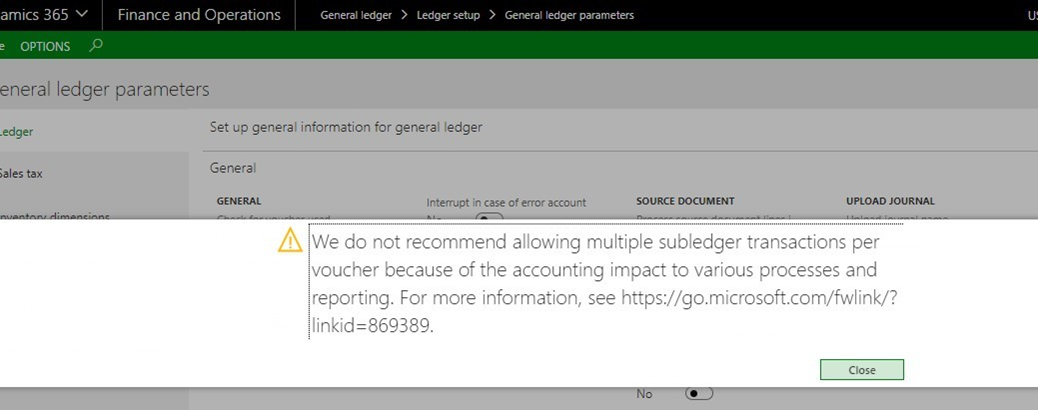
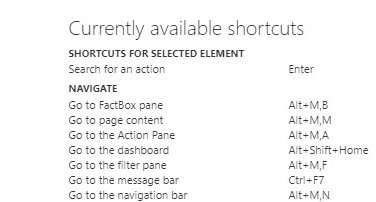
مایکروسافت این بهبود را بشرح ذیل توضیح می‌دهد: با این بروزرسانی، میانبرهای موجود هر فرم را می‌توانید به طور مستقیم در آن فرم پیدا کنید.  بر روی کنترل مورد نظر راست کلیک کنید و به سادگی گزینه مشاهده میانبر را انتخاب کنید. با این عمل یک صفحه محاوره‌ای برای شما باز خواهد شد که لیست کل میانبرهای قابل استفاده در صفحه را به شما نشان خواهد داد.

البته طی این بروزسانی مشکلاتی مشابه آنچه که در بخش اول توضیح داده شده، رفع نشده است و همچنان در صورت عدم وجود عملیاتی در فرم جاری، کاربر به فیلد جستجوی ارجاع داده خواهد شد و مشکل مپوشانی و تعریف دو میانبر برای یک منظور نیز رفع نگردیده است.

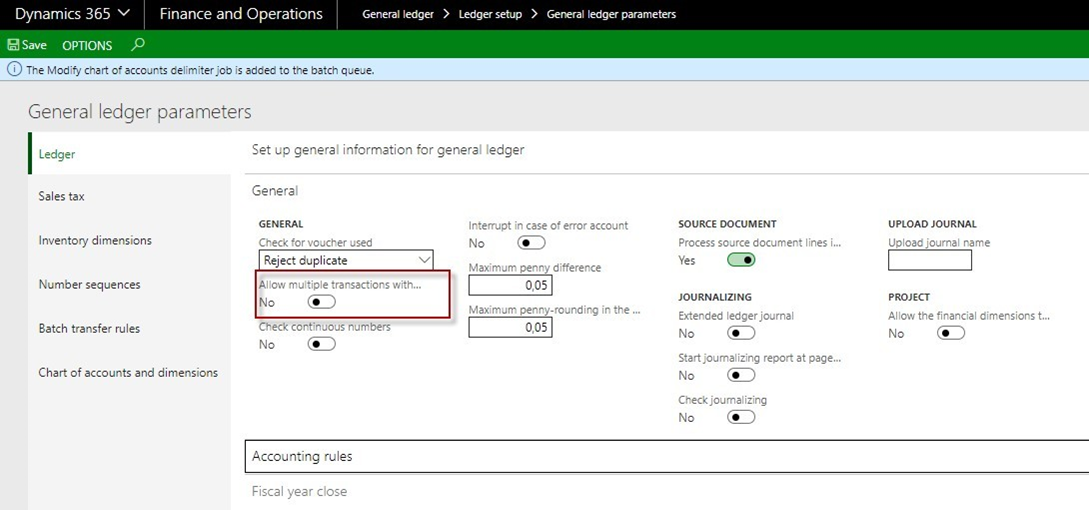
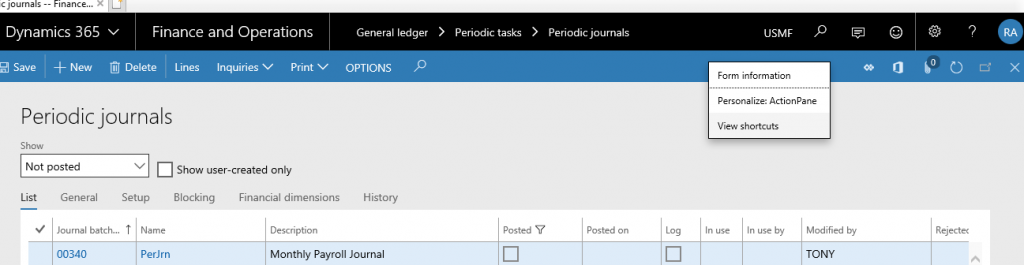
اما با این بروز رسانی اطلاعات صحیح در خصوص میانبرها با راست کلیک کردن بر روی فرم و انتخاب گزینه “View shortcuts” وجود دارد.

این انتخاب یک صفحه جدید را باز می‌کند که شامل اطلاعات میانبر می‌باشد. از آن جمله میانبرهای (Alt+G) و  (Alt+Q).

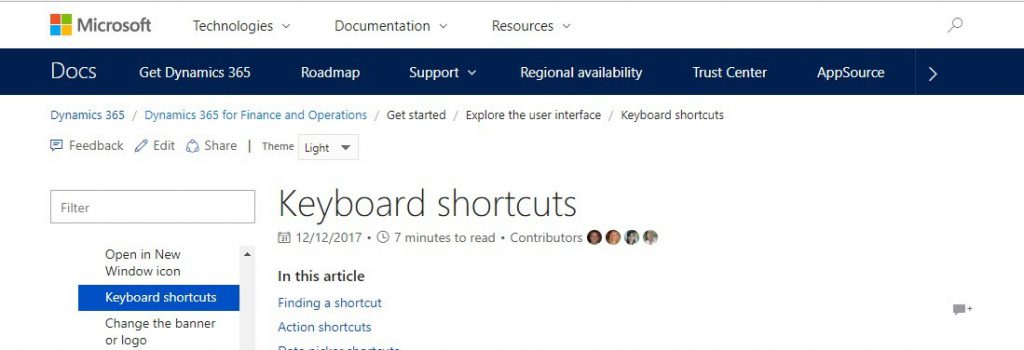
و زمانی که گزینه “View all product shortcuts”  را انتخاب کنید بصورت مستقیم به صفحه میانبرهای مایکروسافت در سایت docs.microsoft ارجاع داده خواهید شد.

در پایان امیدواریم که امکان “Available keyboard shortcuts” منتشر شده طی بروزرسانی PU12  کمکی به کاربران برای استفاده بیشتر از صفحه کلیک و کلیک کردن کمتر با موس باشد.

کانال تلگرام:  https://telegram.me/dynamics_ax

میانبرها در داینامیکس ۳۶۵

کلیدهای میانبر

همانطور که انتظار می‌رود کلیدهای میانبر در داینامیکس ۳۶۵ مالی و عملیاتی قابل استفاده می‌باشند و استفاده از این امکان، رابط کاربری آسانتری  برای کاربر فراهم می‌آورد.

نکته : کلیدهای میانبر شرح داده شده در این قسمت مطابق با صفحه کلید استاندارد ایالات متحده آمریکا می‌باشد. کلیدهای میانبر با استاندارهای سایر کشورها امکان عدم تطابق موردی با این لیست را خواهد داشت.

پیدا کردن کلید میانبر

از به روز رسانی پلت فرم ۱۱، کاربران می توانند کلید های میانبر نسخه در حال استفاده را، به طور مستقیم از رابط کاربری استخراج نمایند. برای این منظور با کلیک راست بر روی یک کنترل و انتخاب گزینه مشاهده میانبرها (View shortcuts) به سادگی می‌توان میانبر آن گزینه را کشف کرد. این گزینه یک فرم محاوره‌ای را نمایش می‌دهد و مشخص می‌کند در صفحه فعال چه میانبری برای آن گزینه تعریف شده است.

در ادامه این میانبرها بصورت لیستی ارائه شده است. به منظور مفهوم بودن عملیات، لیست آنها ترجمه نشده است. در صورت نیاز به توضیحات موردی با ما در ارتباط باشید.

Action shortcuts

To do this Press
Open action search Ctrl+’ or Alt+Q
Move to the standard Action Pane Alt+M,A or Ctrl+F6
Open a tab on the Action Pane or a menu Enter or Space or Alt+Down arrow
Move to next/previous option in a menu Down arrow / Up arrow
Close a tab on the Action Pane or a menu Esc
Simulate a right-click Shift+F10
Open the Finance and Operations context menu Ctrl+F10
Execute the default button on a form/dialog box Alt+Enter
Click a button or tile Enter or Space
View refresh information for a count tile Alt+Up arrow
View currently available shortcuts Alt+Shift+K

Date picker shortcuts

To do this Press
Open the date picker Alt+Down arrow
Move between dates in the date picker Ctrl+Arrow keys
Move to the next/previous month Page down / Page up
Move to the next/previous year Ctrl+Shift+Page down / Ctrl+Shift+Page up
Move to today Ctrl+Home
Pick today’s date T
Clear the selected date C
Pick Never (or the max date) N

FactBox shortcuts

To do this Press
Open the FactBox pane (or move focus to the FactBox pane if it is already open) Alt+M,B or Ctrl+F2
Close the FactBox pane (with focus in the FactBox pane) Esc
Move to the next/previous FactBox (with focus in the FactBox pane) Alt+Shift+Down arrow / Alt+Shift+Up arrow
Move to the <n>th FactBox (with focus in the FactBox pane) Alt+<n> (<n> = 1-9)
Expand a FactBox (with focus on the FactBox header) Space or Enter
Collapse the current FactBox Alt+0

Filtering shortcuts

To do this Press
Open grid filtering for the current column Ctrl+G
Close grid filtering for the current column Esc
Open the Filter pane (or switch focus between the Filter pane and the main form if the Filter pane is already open) Alt+M,F or Ctrl+F3
Close the Filter pane (with focus in the Filter pane) Esc
Open advanced filtering/sort Ctrl+Shift+F3

Form shortcuts

To do this Press
Create a new record Alt+N
Delete a record Alt+Del or Alt+F9
Save record Alt+S or Ctrl+S
Revert (restore) Ctrl+Shift+F5
Data refresh Shift+F5
Move to the visible first field on the form Alt+Shift+F
Toggle edit mode F2
Attach a document Ctrl+Shift+A
Export to Excel Ctrl+Shift+E
Move to the previous record (outside a grid) Ctrl+Up arrow
Move to the next record (outside a grid) Ctrl+Down arrow
Move to the first record (outside a grid) Ctrl+Home
Move to the last record (outside a grid) Ctrl+End
Close the form (click Back) Esc
Close the form with explicit save Shift+Esc
Close the form discarding any unsaved changes Alt+Shift+Q

Form navigation shortcuts

To do this Press
Move to the next/previous field Tab / Shift+Tab
Move to the next/previous tab Alt+Shift+Right arrow / Alt+Shift+Left arrow
Move to the <n>th tab Alt+Shift+<n> (<n> = 1-9)
Move to the next/previous FastTab Alt+Shift+Down arrow / Alt+Shift+Up arrow
Move to the <n>th FastTab Alt+<n> (<n> = 1-9)
Move to the next/previous blade (vertical tab) Alt+Shift+Right arrow / Alt+Shift+Left arrow
Move to the <n>th blade (vertical tab) Alt+Shift+<n> (<n> = 1-9)
Expand a FastTab (with focus on the FastTab header) Space or Enter
Collapse the current FastTab Alt+0
Switch to grid view Ctrl+Shift+G
Switch to details view Ctrl+Shift+D
Switch to header view Ctrl+Shift+H
Switch to lines view Ctrl+Shift+L

Grid shortcuts

To do this Press
Move to the next/previous column Tab / Shift+Tab
Move to the next/previous row Down arrow / Up arrow
Move to the next/previous row without selecting

[!NOTE] This shortcut applies to multi-select scenarios only.

Ctrl+Up arrow / Ctrl+Down arrow
Select/clear the current row

[!NOTE] This shortcut applies to multi-select scenarios only.

Ctrl+Space / Ctrl+Click
Add the next/previous row to the selected set

[!NOTE] This shortcut applies to multi-select scenarios only.

Shift+Space
Add a range of rows to the selected set

[!NOTE] This shortcut applies to multi-select scenarios only.

Shift+Click
Go to the next/previous page of data Page up / Page down
Create a new row at the bottom of the grid Down arrow (from the last row)
Select or clear all rows Ctrl+Shift+M
Move to the first record Ctrl+Home
Move to the last record Ctrl+End
Execute the default action in a grid

[!NOTE] This shortcut is enabled when focus is on a cell containing a hyperlink and all cells in that column have hyperlinks.

Enter
Toggle focus between the selected row and the header row Alt+Shift+H
Make the current column larger/smaller (with focus in the header row) Right arrow / Left arrow
Open grid filtering for the current column (with focus in the header row) Enter

Input control shortcuts

To do this Press
Open the hyperlink Ctrl+Enter
Enter the session date in a date field D+Tab
Enter the current date in a date field T+Tab
Open lookup, combo box, date picker, drop dialog box Alt+Down arrow
Close lookup, combo box, date picker, drop dialog box Esc
Move focus into a lookup (when the lookup is already open) Alt+Down arrow
Open the control’s enhanced preview Alt+Up arrow
Select text in the current field Ctrl+A
Enter/leave the text area in an HTML editor control Alt+Down arrow / Alt+Up arrow
Switch focus between the text area and the toolbar in an HTML editor control F6

Messaging shortcuts

To do this Press
Go to the Message Center Ctrl+Shift+F7
Go to the Message Bar Ctrl+F7

Navigation shortcuts

To do this Press
Go to the dashboard Alt+Shift+Home
Move to the navigation bar Alt+M,N or Alt+Shift+F1
Move to the company picker Ctrl+Shift+O
Search for a page Ctrl+/ or Alt+G
Open the help pane Ctrl+?
Open the trace parser Alt+Shift+T
Move to the navigation pane Alt+F1
Add/remove form as a favorite (with focus on a form in the navigation pane) Shift+F
Move to the standard Action Pane Alt+M,A or Ctrl+F6
Move to the Filter pane (which may include opening it) Alt+M,F or Ctrl+F3
Move focus to the page content (with focus in the Filter pane) Alt+M,M or Ctrl+F3
Move to the navigation list on Details form (which may include opening it) Alt+M,S or Ctrl+F8
Move focus to the page content (with focus in the navigation list) Alt+M,M or Ctrl+F8
Close the navigation list on Details form (with focus in the navigation list) Esc
Move to the main page content (with focus in another pane) Alt+M,M
Move to the FactBox pane (which may include opening it) Alt+M,B or Ctrl+F2

Personalization shortcuts

To do this Press
Transition the page into personalization mode Ctrl+Shift+P
Use the Select tool (when in personalization mode) S
Open the selected control’s quick personalization dialog box (when using the Select tool) Space or Enter
Use the Move tool (when in personalization mode) M
Select the current control as the one to move (when using the Move tool and no control has been selected to move yet) Space or Enter
Clear the control to move (when using the Move tool) Esc
Move to the next position for the selected control (when using the Move tool) Tab or Right arrow or Down arrow
Move to the previous position for the selected control (when using the Move tool) Shift+Tab or Left arrow or Up arrow
Use the Hide tool (when in personalization mode) H
Switch whether the current control is visible or hidden (when using the Hide tool) Space or Enter
Use the Skip tool (when in personalization mode) K
Switch whether the current control is in the tab sequence (when using the Skip tool) Space or Enter
Use the Edit tool (when in personalization mode) E
Switch whether the current control is editable or read-only (when using the Edit tool) Space or Enter
Use the Summary tool (when in personalization mode) U
Switch whether the current control is a summary field in the current fast tab (when using the Summary tool) Space or Enter
Use the Add tool (when in personalization mode) A
Select the control whose container will be used to insert the new fields (when using the Add tool) Space or Enter
Import a personalization (when in personalization mode) I
Export a personalization (when in personalization mode) X
Clear this page’s personalizations (when in personalization mode) Ctrl+C
Move focus between the personalization toolbar and the page (when in personalization mode) T
Exit personalization mode (when in personalization mode) Esc

Segmented entry shortcuts

To do this Press
Open the drop-down list (when the drop-down list is closed) Alt+Down arrow
Move focus into the input field for the current segment in the drop-down list (when the drop-down list is already open) Alt+Down arrow
Close the drop-down list Alt+Up arrow
Close/open the right portion of the drop-down list Alt+Left arrow / Alt+Right arrow
Switch between “Show valid” and “Show all” modes Alt+W
Select the value from drop-down list and move to the next segment Enter
Move to the next/previous control on the page (when focus is in input control) Tab / Shift+Tab
Move to the next/previous input field in the flyout (when focus is in the drop-down list) Tab / Shift+Tab
Move up/down a row in the lookup Up arrow / Down arrow
Move up/down a page in the lookup Page up / Page down
Move to the top/bottom of the lookup Home / End

منبع :

https://docs.microsoft.com/en-us/dynamics365/unified-operations/fin-and-ops/get-started/shortcut-keys

کانال تلگرام:  https://telegram.me/dynamics_ax

داینامیکس ۳۶۵ مالی و عملیاتی- منسوخ شدن One voucher

در داینامیکس ۳۶۵ بهار ۲۰۱۸ مایکروسافت مطلب را با عنوان “One voucher deprecation” مطرح می‌کند که ترجمه آن بشرح ذیل است :

” برای ژورنالهای مالی (از جمله ژورنال حسابداری، ژورنال دارایی ثابت، ژورنال پرداخت های فروشنده و غیره) قابلیتی وجود دارد که به شما امکان می دهد تا تراکنشهای متفاوت را در یک ژورنال ثبت نمایید. این امکان ” One voucher ” نامیده می شود و البته استفاده از آن منجر به مشکلاتی در خصوص تسویه، محاسبه مالیات، بازپرداخت حساب مربوطه در حسابداری، گزارشات مالی و موارد دیگر می‌گردد. با توجه به این مسائل، قابلیت One voucher ، منسوخ خواهد شد. اما به دلیل شکافی که در صورت حذف آن ایجاد می‌شود، این عملکرد به یکباره منسوخ نخواهد شد. بجای آن، از برنامه زیر استفاده خواهیم کرد:

  • نسخه بهار ۲۰۱۸: این قابلیت بصورت انتخابی به پارامترهای حسابداری اضافه خواهد شد و البته بصورت پیش‌فرض غیرفعال می‌گردد. با این وجود، اگر سازمان شما دارای سناریوی وابسته به این قابلیت باشد، می‌توانید با استفاده از پارامترها نسبت به فعال‌سازی آن اقدام نمایید.
  • در صورتیکه سناریوی کسب و کار به قابلیت One voucher نیاز ندارد، نسبت به فعال شدن آن اقدام نشود. زیرا ما نسبت به رفع خطاهایی که در صورت فعال شدن آن ایجاد شود، اقدامی نخواهیم کرد.
  • استفاده از One voucher را در داینامیکس ۳۶۵ مالی و عملیاتی متوقف نمایید، مگر اینکه بعلت شکافهای عملکردی مجبور به استفاده از آن می‌باشید.
  • نسخه پاییز ۲۰۱۸ و بعد از آن : شکافهای عملکردی رفع و تکمیل خواهد شد. بعد از تکمیل این موارد، عملکرد One voucher بصورت دایم و کامل متوقف خواهد شد.

محل‌های استفاده از one voucher

گزینه One voucher در موقعیتهای متفاوت مورد استفاده قرار می‌گیرد:

  • انتقال ابتدای دوره‌ای که شامل تراکنش‌های مشتری و فروشنده می‌باشد،
  • انتقال مبلغ از یک فروشنده به فروشنده دیگر،
  • تسویه تراکنش‌ها بین مشتری و فروشنده‌ای که ذاتا یک شخصیت یا شرکت می‌باشند(same party ID)
  • پست دریافتهای مشتریان متفاوت به یک حساب بانکی طی یک تراکنش

مایکروسافت مشکلات و سناریوهای مرتبط با قابلیت one voucher را توضیح می‌دهد. “شکافهای عملکردی که حذف این امکان ایجاد می‌کند طی نسخه پاییز ۲۰۱۸ و نسخه‌های بعد از آن رفع خواهد شد. ”

لیست آنها را در لینک ذیل ببینید:

https://docs.microsoft.com/en-us/dynamics365/unified-operations/financials/general-ledger/one-voucher

 پارامترهای حسابداری جدید- اجازه ثبت تراکنشهای متفاوت در یک سند

همانطور که ذکر شد در نسخه بهار ۲۰۱۸ گزینه جدیدی در پارامترهای حسابداری وجود دارد، با عنوان

.”Allow multiple transactions within one voucher”

این گزینه در تب Ledger و در قسمت General می‌باشد و بصورت پیش‌فرض گزینه “No” می‌باشد.

در حالتی که که این گزینه No است، یک ژورنال حسابداری ایجاد کرده‌ام و همانطور که مشاهده می‌نمایید در هر دو قسمت حساب و طرف حساب مقابل گزینه Vendor انتخاب کرده‌ام.

در هنگام تایید کردن ژورنال پیامی به شرح ذیل دریافت می‌شود :

“There can only be one vendor or customer transaction per voucher”

پس امکان پست کردن این ژورنال وجود ندارد.

به صفحه پارامترهای حسابداری برگشته و گزینه “Allow multiple transactions within one voucher” را با انتخاب گزینه  “Yes” فعال می‌کنم.

وقتی که این گزینه فعال می‌گردد، پیغام اخطاری نمایش داده می‌شود و اعلام می‌شود که مایکروسافت استفاده از این گزینه را پیشنهاد نمی‌کند. پیغام را نادیده گرفته و گزینه “Yes”  را انتخاب می‌کنم.

و در پایان ژورنال مشابه آنچه که ثبت شده بود، بعد از این تغییر در پارامترهای حسابداری ثبت و پست شد.

ایجاد ژورنال- One voucher number only

در صورت ایجاد یک ژورنال جدید در آدرس

,General ledger > Journal setup > Journal names

می توانید در فیلد “New voucher” از لیست نمایش داده شده، گزینه “One voucher number only” را برای آن نوع ژورنال انتخاب کنید.

مایکروسافت محل استفاده از آن را ثبت یک ژورنال برای سرفصلهای حساب متفاوت و پست آن نیز طی یک سند، اعلام می‌دارد و همچنین اعلام می‌کند پشتیبانی از آن ادامه دارد.

نتیجه

مایکروسافت سناریوهای متفاوت و مشکلات مربوط به استفاده از آیتم one voucher را اعلام می‌کند. شکافهای عملکردی که حذف این آیتم ایجاد می‌کند طی نسخه‌های پاییز ۲۰۱۸ و نسخه‌های بعد از آن مرتفع خواهد شد.

آنچه که مایکروسافت در این خصوص اعلام کرده است در لینک ذیل قابل مشاهده می‌باشد:

https://docs.microsoft.com/en-us/dynamics365/unified-operations/financials/general-ledger/one-voucher

امیدواریم که مایکروسافت همه شکافهای عملکردی مربوط به گزینه “One voucher”  را تا قبل حذف آن رفع کند و امکانی برای انتخاب مشتریان و یا فروشندگان متفاوت طی یک سند را فراهم آورد.

کانال تلگرام:  https://telegram.me/dynamics_ax